Sunday, September 30, 2012

Bizbee's been sick, but we think he's going to be OK!

 Last Tuesday night we realized that the baby, Bizbee, wasn't feeling too great.  We got him into the vet's office on Wed AM and he was running a high fever of 105ยบ and they thought he might be a victim of what is commonly called "bobcat fever", aka cytauxzonosis, a highly-fatal illness that runs rampant around here.  It's a tick-borne illness and bobcats are the carrier of the tick.  

We had to leave him there and he was put on IV fluids and antibiotics.  He was one sick little cat.  Well, not too little, he weighed 7 pounds and they were pleased that he's a big boy and up to now, very healthy.  We visited him on Thursday and got him to eat for us, which was huge, and again on Friday.  Sat AM they called and wanted us to bring him home for the weekend and see how he does.  

We're giving him his meds here, 2 different things, one is 3x a day and one is 2x a day so we had to write it all down so we don't get it screwed up.  LOL

While his blood tests are not showing the cytauxz organism, they really think he has it and is fighting it off.  They've seen a lot of these cases and says he has the look about him, especially in his eyes.  We trust our vet completely and she has the nicest staff, they all love Bizbee to bits, he came from there and they know him well.  

We were SO worried, and our house felt really empty without him.  It's wonderful to have him home, even if we have to take him back tomorrow morning for more tests and treatments.  I hope they let him come home again, but we'll have to see what they say.  
Here he is last night, resting up for bedtime.  :)  He's guarding my little pile of fabrics that are waiting to be washed.


 And this is Bizbee this morning- see how he's working on that bandage?  Lil' brat!


 I just love when cats yawn.  :)


 Yep, we're all tickled that he's home!


 It's been a very unproductive week between running back and forth to the vet's office and spending lots of time with my parents.  I have absolutely nothing to show off that I've made. 

Sunday, September 23, 2012

Lots to show- received swap items, weather predictions and more!

 First, the weather prediction- we cut open some wild persimmon seeds.  See the spoon shapes?  That means we're likely to have a very snowy winter.  If they were knives, it would mean cold, sharp winds.  Pretty cool, huh?  It's usually pretty accurate, too.


 I just recently received my FLiQS quilt from my wonderful partner, Jana/megmormel.  I just love this little circle/rainbow quilt, it's darling and so well made!  She also included a mug rug and some salt water taffy, she lives on the Eastern Seaboard.  It's delish and I just loved everything, thank you so much, talented Jana!


 Lovely, isn't it?  She pegged me very well, she knew I loved rainbow/bright colors and those lovely grays in the background are the perfect foil for the brights.


 The back is darling, too.  She embroidered and pieced the label. 


 In the Bitty Block Bee, bouncypoodle/Pattiann picked sunflowers for her theme.  I made her this screen door block with a view out onto a farm scene.  The cute fabric is by Wilson & Wilson Folk Art Co, here in Eureka Springs.  It's several years old and I've been hoarding it.  :)


 The door opens....


 A few little 3D touches...


 I let the fabric do the sunflower work for me this time.


 And the other block I made for Pattiann- the center is full of seeds, all outlined by machine.


 Since the FLiQS quilt I made has been delivered, I can now show off the label.  It's a kaleidoscope quilt so I thought I should make a kaleidoscope label.  My partner was mollyjolly/maria and it turns out, she's always loved kaleidoscopes, which I didn't know.  Lucky coincidence for us, I think!


 I used a piece of Kaffe Fassett fabric, embellished it with beads and covered it with heavy vinyl.  Added a tiny binding and then stitched it on to cover the end of the hand-appliqued base.  It will swivel up so she can see the words.


 This is the front of the quilt, almost all Kaffe Fassett fabrics. 


 And this is the wonderful mug rug I received from Jodie/jm1122 in the Scrappy Mug Rug Swap!  I love it, it's got 2 sea turtles on one side and a fun octopus on the other! 


 She also send me generous pieces of her background fabrics because she knew I really liked them and treats for the dogs and cats, how sweet was THAT? 


Bizbee highly approves of the treats and has taken over part of the computer armoire, 
I think he likes my mouse!


So it's been a busy few weeks around with great stuff arriving in the mail and ooohing and aaaahing!  I hope you've been having fun, too.  I'm trying to think of a project to get me going.  We're going thru some issues with my mom and her health right now and I could use a distraction.  I'm tossing around using some of my bitty blocks to make a perpetual calendar. If I can BEAR to use some of them, that is, and if I can make myself actually make a real decision, I'm turning into a waffler and I hate that!


Monday, September 3, 2012

Finished Doll Quilt- FLiQS and some cute Bizbee-ness!


Had to start out with a cute shot of the boy sleeping on the doll quilt before I got it quilted. 


And here it is, quilted..... I just enhanced the light circles by quilting inside them and carrying it into the border. 


Here it is all finished....


...with a hint of the back showing.  
For a change, the binding worked well with the front and the back, yay.  The backing is cool, looks great up close, click on the photo for a closer view.


I haven't made a label yet.


And here's Bizbee snoozing on the quilt in the rocking chair.  
He obviously doesn't appreciate the lamp being on and shining in his eyes.  :)


He got neutered last week and came home from the vet, same day, 
feeling fine and playful and full of beans!   We were glad to get him back, 
we missed him that day for the whole 6 hours he was gone. 

Happy Labor Day!  I hope you are all off doing something fun instead of reading this blog.  :)

Saturday, August 25, 2012

Bitties, Mug Rugs and a Fab Little Quilt to Swap...


 The themes for August were cats and Halloween- So I made everyone in my group a miniature Nosey Parker.  :)  This is a 3.5" take-off from a mug rug I made a while back, in the spring.  I can't believe I forgot to add whiskers to them, though!  They've all been mailed out whisker-less.  Dumb butt! Oh, well, I guess everyone can add their own if they want them.  I spent a long time on the handstitching on these, I watched a lot of Olympics while I worked on them. 


 For my Halloween blocks, I made some mini Amy Bradley vampires!  I love how they turned out, and I only had to embroider his mouth, yay.  :)  The fangs are white paint.


 My 2nd group got these- I saw something like this in a new magazine and loved it- a couple of people didn't get it, until it was explained to them.  YOU get it, right?


The summer mug rug swap- my partner likes beach/ocean things and I found a cute clipart drawing of a turtle.  He translated nicely to fabric.  A little seaweed, some sand and water and he's good to go.  I hate to send him away, because I have a special place in my heart for sea turtles.  They struggle from the moment they hatch to survive and only one in 5000 makes it to adulthood, they say.
Those are horrible odds!


And I just recently sent off an angel mug rug to the UK- a lady that was in our spring swap never received her mug rug so I made her this using a birdhouse bitty I had, and some Kaffe Fassett fabrics.  I hope she likes it. Better late than never, and better than getting nothing!  :)


And speaking of Kaffe Fassett, I am using his fabrics to make a mini doll quilt for my partner in FLiQS, Fab Little Quilt Swap.  It's a kaleidoscope quilt, paper pieced, and gives great illusions of light and dark large circles, which you can see beginning to happen if you squint at this.  Here's a small sample of it, this is 6 blocks, there will be either 25 or 30 in the quilt.  Each block finishes at about 3.25", so it'll only be 16" x 20", roughly, without a border.  But I'll add a border to try to tone it down a little.  It's going to be wildly busy.  I've got 18 blocks done now, only 7 or 12 to go!


So that's I've been working on, while Bizbee continues to grow.  He's getting his adult teeth now, currently he has 2 fangs on each side, and he's so rambunctious, almost crazy.  He gets neutered next week, maybe that'll calm him down a tiny bit.   Or maybe it's the teething making him nutsy, whatever.  I just hope he doesn't stay like this, he's a real handful right now!  Cute when he's sleeping, though!


Have a great weekend!  Jim's at an all-day firefighter class, so I've got the house to myself, I'm going to go knock out some more little blocks for my quilt!  What are YOU doing today?

Sunday, July 22, 2012

Star Wars bitties and Bizbee's into everything!

 This little guy is so funny and so BUSY!  He's at the stage where he's destructive and stubborn and getting into lots of trouble.  Dashing out the door when he gets the chance and just generally being a pain.  Then he gets sleepy and cuddly and all is forgiven.  :)


He's a great yawner, too. 


 I got done with my August bee bitty blocks early- the theme Kandra wants is Stars Wars so I made her a Death Star.....


 ...and Princess Leia.  I had some newsprint fabric and I wanted to make it look like Princess Leia was in the newspaper, but I didn't have enough room to pull that off.  So I spliced out some words and made an inspirational quote underneath her, instead.   It says "She Had Neither Fear Nor Doubt of Success".  That was actually referring to Amelia Earhart's Atlantic crossing, but I thought it worked well for this.   This block is 3.5" x 5.5", but Kandra can bring it back down to a 3.5" square simply by removing the black part, if she wants to.  I made a lightsaber out of a toothpick, red paint and gray embroidery floss.  And her belt is made from micro beads.


 My first plan was to make Jabba the Hutt and Yoda, but someone else beat me to it.  Star Wars is not my favorite series, so I had to do a lot of clipart searching and coloring book pages searching to get ideas.

Now it's time to start working on August's bitty blocks for the regular group, I signed up to do 24 Halloween ones.  I started those yesterday.  
I won't say what they are yet, but I vant to bite somezing right now!

Have a great Sunday, people!

Saturday, July 14, 2012

Just a few bitty blocks to show...

  The theme this month for bitties was "dogs", so I used a clipart piece for inspiration and made these-
little pups in the bathtub.  The ears are 3D but I tacked them down because they had a tendency to flip up.


 In the Bitty Block Bee, Denise's theme is mushrooms, so I made her a faerie ring.  I love this one, it's different from what I usually make, I embroidered the tiny mushrooms onto the dark green.  I like the light green fabric with the rings on it with the birch/aspen tree trunks, looks really pretty. 


 And this is her other one- the magical musical mushroom!


 I stitched the lettering on by tracing the letters onto vellum and then laying the vellum on the dotted fabric and a piece of newsprint under the fabric.  Stitched on my lines and then had to pull off the vellum from the top and the newsprint from the bottom, then tie off all the threads.  That took a while! Then I sewed the top of the mushroom all the way around to another piece of dotted fabric, sliced the back piece open and turned it and pressed it.  Then slip stitched it down onto the background, after making and attaching the stalk, using the same method. 


Turned out good!  Reminds me of a place in Orlando I went to a few times in the 70's- The Infinite Mushroom.  It was a fun head shop full of wild and crazy and colorful things that came in pretty handy back in my youth.  *ahem* 


Bizbee continues to grow and now there is only one place in the house that he hasn't been to- the top of the computer armoire.  Oy.  It won't be long though- he saw Gravey jump up there from the rolltop desk and he's been plotting and scheming ever since!  This is the same launching area where he knocked over 2 lamps just a couple of weeks ago.  Kids. Sheesh.  And boy kids are even tougher than girl kids!  He's knocked over more stuff than Nosey Parker and Gravey combined.


We love him to bits, though.  He gives the best head-butts and rubbing smoochies on your face and nose and chin, then he licks you with the roughest little tongue ever.  We call him The Exfoliater. LOL

Wednesday, July 4, 2012

Easy Tutorial for E-Reader Cover Using an Old Book

A while back I posted a mini-tute for making a hardback cover for an e-reader.  I am just now getting around to making myself a new cover, just so I'll have a change, and I went ahead and took photos of the process.  So this is a better tute with more photos and instructions. 

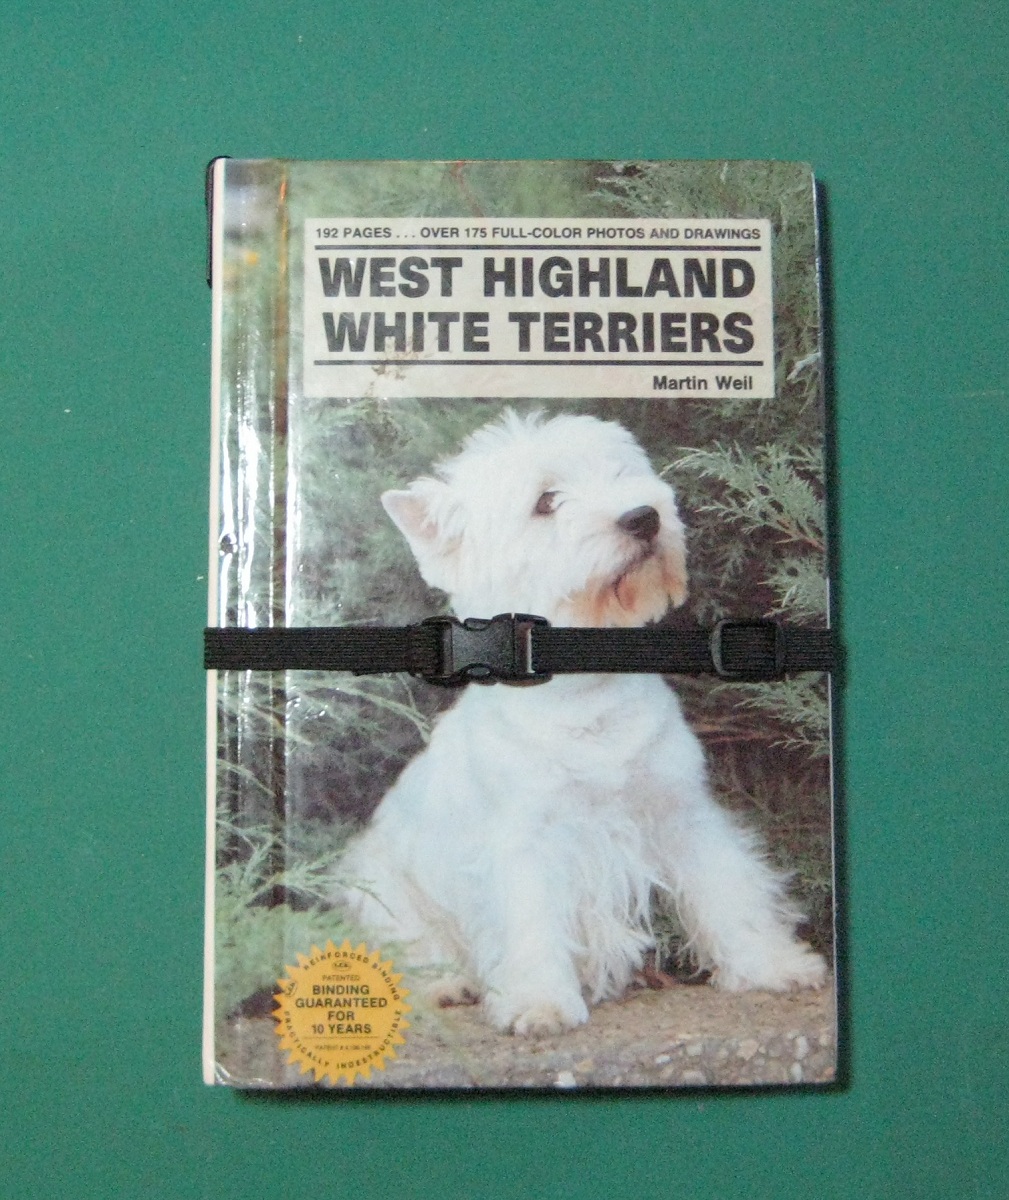
I went to a used bookstore and picked up this dog book.  I like these kinds of books, the cover is hard and slick and will stay clean and won't pick up pet hair.  I pulled out a fat quarter of some fun camping fabric that I won't mind looking at for an hour or two every day and assembled the rest of my "ingredients", which are very few and simple.

Scissors, rotary cutter, pinking shears, Exacto blade or razor blade,  thread, 1/4" or 3/8" black elastic, a clasp (or velcro), white glue (Tacky or Elmers) and something heavy for weight. 


 When you pick out a book, make sure it's big enough to accommodate your reader.  It needs to be a little bigger than the reader and also thick enough.  Skinny little books might be too thin.


 This book is plenty thick enough!


 Remove the pages by cutting thru the tape that holds it in.  Don't cut through the actual front or back of the book!


 Cut gently.


 Cut both sides, remove the pages and then trim up what's left so it's tidy. 


 Before trimming, below-


 After trimming, below-


 Measure to find how wide and long to cut the piece of fabric that will reinforce this naked area and cover up all those raw edges.  3" x 8" is enough for this book.


Pink the top and bottom edges.


You will need a piece of fabric that is wide enough to hold your e-reader and cover that back cover of the book.  Then add 1/2" to that for seam allowances.  Measure the inside length of the book and double that and add an inch or two so you'll have extra fabric to fiddle with.  Now you know how big a piece of fabric to cut.  And cut a piece for the inside cover on the left.

My pieces are about 5" x 8", 3" x 8" and 5.5" x 18" (but 19" would have been easier if I had had enough fabric.)


 Brush on white glue and glue down the middle piece. Get it nice and flat and into all the creases so it won't pull up later when you're bending your book a lot.


 You can brush on more glue on the edges to ensure that they stay down.  If you do this to the pinked edges, be aware that they will dry a little rough and crunchy. 


 For the pocket panel, with right sides together and the fold at the bottom, sew up each side using a 1/4" seam.  Leave the top open.  Turn and press. 


 Because my panel was a little short and because the bottom of the pocket panel is left loose, I decided to add this extra piece here so I wouldn't have to look at raw book later.  It's applied just like the center piece, I brushed on white glue with my old sprung brush.


 Fold up about 1/2" - 3/4" at the bottom to make the pocket that will hold your e-reader.  The fold is the top of the pocket.  Try it on for size. Once you're comfortable with your pocket, pin it in place.


 See the pocket?


 Move the pins and try it on again.  If your panel is a lot wider, adjust where you will stitch in order to make the pocket tight enough but not too tight.


 Now it's time to add a piece of elastic to hold the top of the e-reader in place.  This will keep it from slipping out of the pocket when you're holding it or carrying it around.


 Place the elastic where you want it and pin it.  Then sew one side with the elastic wrapped around to the back to hide the raw edge.  Sew from the folded pocket up to the top, thru both layers of elastic. On the other side, just baste the pocket into place. 


Then put the e-reader back in and pull the elastic across.  Find where you want it and mark it.  Then determine how tight you want the elastic.  I like it to hold it, but I don't want it stretched really tight because then it's hard to keep the fabric glued down into the book.  Snug is all you should need, but you do it the way you feel best.  Then sew the other edge just like you did the first edge.


Try it in the book for size, then fold down the excess raw edged material at the open top, to the back.  Press.  Sew a large X thru both thicknesses and reinforce your pocket and elastic stitching, too.  Also sew across the top to hold that excess to the back.  Trim it off if necessary. (I didn't edge stitch the top too closely because I wanted a little room to slide an opened paperclip into that space.)


 Now you can glue this panel into place.  Apply white glue to the book and be sure to get a good amount down, especially where the elastic is.  BUT!  Don't glue the pocket down.  It needs to stay free so the e-reader can slide in and out easily, for charging, downloading, etc. Because this part is loose and you can see under there, that is why I added that other piece of fabric, I wanted to cover that part of the book up.  It finishes it off nicely, no raw book showing.


 I put a piece of cardboard down over the panel (except for that bottom inch or so where the pocket is) and weighted it down with birdseed and rocks.  (That was exciting, the bag holding the rocks broke right then and 400 little shiny pebbles went everywhere, CRAP!)  I also glued down the fabric inside the left cover.


 I left that to dry overnight.  Now it's time to finish it up!  Another piece of elastic for the closure and a breakaway cat collar buckle.  You could make your strap from ribbon, fabric, velcro, a snap, whatever.  I have these buckles that I use to make our cats collars and they come in really handy. Click that link for more info on getting the same hardware.


 I made the strap just like a collar - it's adjustable in case the elastic ever starts to get weak.  I punched 2 small holes thru the back of the book with a small nail and a hammer and then sewed the elastic in place with just a couple of stitches.  See the stitches just below the center of the X?  It just needs to be strong enough so you don't lose the strap.


This is how it looks with the e-reader in place.  My stylus rides inside on the spine and I have a bent paperclip in the top seam allowance that is my reset pin if ever I need it.  My power button is inside the pocket at the very bottom edge but I can feel it and press it thru the fabric to turn it on and off.


 And all closed up.  Look, puppy has a big collar!  :)


It's a really easy project- if you didn't have to wait for glue to dry, you could do this in 2 hours or less, I'm sure.  And you'd have a nice hard cover for your e-reader, one that the cats can walk across and not cause you to flip out.  I hope that this tute was helpful.  Have fun at the used bookstores, finding just the right book for your e-reader!