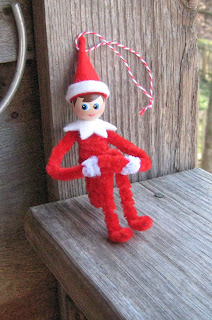
I made a bunch of cute little elf ornaments for a party that I attend every year- recognize him? :) I don't want to call him out because I don't need to get a letter from a lawyer yelling at me, but I thought you might like to see him and see how I made him. I think he turned out pretty cute and since the doll is so trendy right now, I thought he was appropriate for this years party.
Ingredients- I started with a lot of red chenille stems and a few white ones. Red and white felt and 3/4" or 20mm wood beads for heads. Acrylic paints (flesh, spice brown, cardinal red, white, black and blue), hot glue and tacky glue and red/white twist twine.
First I had to twist 4 red stems for each elf. This was hard on my fingers, but I did it over 2 days. My husband folded them all in half for me, saving me some time. I didn't want to use a drill because I wanted a loose twist so I would retain length. On the arms, I twisted on a bit of white chenille to make his little wrist cuffs. His hands should be all white, but this worked well enough.
Then I bent 2 of them into legs, I used a wooden jig for this- a few well placed nails made shaping the legs really easy and then they were exactly alike. Curved the other 2 into arms. Took another long stem, bent double about 1" from the top, that makes the neck. Holding the 2 leg pieces with the long piece (neck up) sticking up in the middle and then placing the arms just below the neck, with the neck sticking up higher, I bent over the tops of the legs, locking them onto the arms (forming shoulders) and then I took the raw ends of the arms and locked them around the torso. Then I took the long piece that was sticking down and starting at the bum area, wrapped the long stem around the legs and up to the chest/arm area, criss-crossing over the torso and locking all the pieces into place.
Time to paint some heads! This was time consuming because I made 30 of them. And when I did the eyes, I had to wait for the big white dot to dry, then the blue dot, then the black dot, then the highlight dot. Lots of waiting! First- I base coated them with flesh colored paint. Then I guesstimated where the hair should be and painted that on. Then the time-consuming eyes using the ends of 4 different sized brushes to get a good dot, then some watered down red for the cheeks, using a sprung brush to get a soft effect for the cheeks and a liner brush for a simple mouth. After it was all dry, I varnished the heads.
Be sure to let the eye dots dry completely before doing the cheeks, you don't want to smear any eyes!
Then it was time to assemble. The hats were a cone of red felt, a 1/4 circle sewn on the straight edge, not turned. I had earlier cut out all 30 white collars, I snipped all the zig zags by hand, next time I would try pinking scissors because my way took way too long! I cut a bit out of each white circle to make it more cone shaped and hot glued a collar around each neck. Then I glued a hat to each head, using the hot glue, then added a strip of white to each hat, more hot glue. Then I glued the head to the neck,with tacky glue, just a bit smeared onto the neck. If the neck was too long, that was OK because the hat hid it.
Assembling took over 4 hours! Sheesh. I thought these were going to be quick and easy!
I still have to tie their little hands together and add a hanger to the hat.
And here he is, all finished! I put each one into a glassine bag with lime green shredded crinkle paper and tied them shut with lime green curly ribbon, they looked so cute in their bags!
Here's the December calendar- I added a panel to the side so I could show off more of the cute bitty blocks that I have.
And here are the event tags- first I made the ornament but it didn't excite me, so then I made the Santa. And a party hat and glass of champagne for New Year's Eve.
That's it! I hope everyone has a great Christmas and enjoys their friends and family!

.jpeg)
.jpeg)


